Nissan Rogue: Headlight and turn signal switch
Xenon headlights (if so equipped)

 HIGH VOLTAGE
- When xenon headlights are on, they produce a high voltage. To prevent an electric shock, never attempt to modify or disassemble. Always have your xenon headlights replaced at a NISSAN dealer.
- Xenon headlights provide considerably more light than conventional headlights. If they are not correctly aimed, they might temporarily blind an oncoming driver or the driver ahead of you and cause a serious accident. If headlights are not aimed correctly, immediately take your vehicle to a NISSAN dealer and have the headlights adjusted correctly.
When the xenon headlight is initially turned on, its brightness or color varies slightly. However, the color and brightness will soon stabilize.
- The life of xenon headlights will be shortened by frequent on-off operation.
It is generally desirable not to turn off the headlights for short intervals (for example, when the vehicle stops at a traffic signal).
- If the xenon headlight bulb is close to burning out, the brightness will drastically decrease, the light will start blinking, or the color of the light will become reddish. If one or more of the above signs appear, contact a NISSAN dealer.

Autolight system (if so equipped)
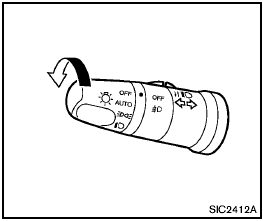
The autolight system allows the headlights to be set so they turn on and off automatically.
To set the autolight system:
1. Make sure the headlight switch is in the
AUTO position.
2. Turn the ignition switch to the ON position.
3. The autolight system automatically turns the headlights on and off.
To turn the autolight system off, turn the switch
to the OFF,  or
or  position.
The autolight system can turn on the headlights automatically when it is dark and turn off the headlights when it is light.
If the ignition switch is turned to the OFF position and one of the doors is opened and this condition is continued, the headlights remain on for 5 minutes.
Automatic headlights off delay:
You can keep the headlights on for up to 180 seconds after you turn the ignition switch to OFF and open any door then close all the doors.

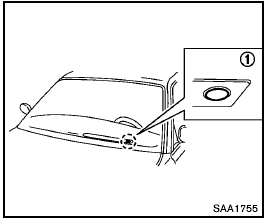
Be sure not to put anything on top of the photo sensor 1 located on the top of the instrument panel. The photo sensor controls the autolight; if it is covered, the photo sensor reacts as if it is dark and the headlights will illuminate.

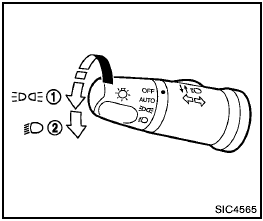
Type A

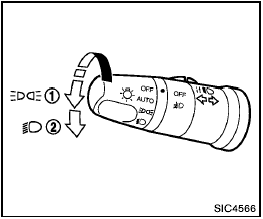
Type B
Headlight switch
Lighting
1 Turn the switch to the  position:
The front park, side marker, tail, license plate and
instrument lights will come on.
2 Turn the switch to the  position:
Headlights will come on and all the other lights
remain on.
Headlight beam select

Headlight beam select
1 To select the low beam, put the lever in the neutral position as shown.
2 To select the high beam, push the lever forward
while the switch is in the  position. Pull it back
to select the low beam.
3 Pulling the lever toward you will flash the headlight high beam even when the headlight switch is in the OFF position.
Battery saver system
- When the headlight switch is in the
 or
or  position while the ignition switch is in
the ON position, the lights will automatically
turn off 5 minutes after the ignition switch
has been turned to the OFF position.
- When the headlight switch remains in the
 or
or
 position
after the lights automatically
turn off, the lights will turn on when
the ignition switch is turned to the ON
position.
position
after the lights automatically
turn off, the lights will turn on when
the ignition switch is turned to the ON
position.

- When you turn on the headlight switch again after the lights automatically turn off, the lights will not turn off automatically. Be sure to turn the light switch to the OFF position when you leave the vehicle for extended periods of time, otherwise the battery will be discharged.
- Never leave the light switch on when the engine is not running for extended periods of time even if the headlights turn off automatically.
Headlight aiming control (if so equipped)

Headlight aiming control (if so equipped)
Depending on the number of occupants in the vehicle and the load it is carrying, the headlight axis may be higher than desired. If the vehicle is traveling on a hilly road, the headlights may directly hit the rearview mirror of the vehicle ahead or the windshield of the oncoming vehicle. The light axis can be lowered with the operation of the switch.
The larger the number designated on the switch, the lower the axis.
When traveling with no heavy load or on a flat road, select position 0.

Xenon headlights are extremely bright compared to conventional headlights. If the xenon headlights hit the rearview mirror of the vehicle ahead or the windshield of oncoming vehicle, the driver of these vehicles may have difficulty driving because of the brightness.
Use the headlight aiming control switch to lower the light axis. See “Xenon headlights” earlier in this section for additional information.
Daytime running light system (Canada only)
The daytime running lights automatically illuminate
when the engine is started with the parking
brake released. The daytime running lights
operate with the headlight switch in the OFF
position or in the  position. Turn the headlight
switch to the
  position for full illumination
when driving at night.
If the parking brake is applied before the engine is started, the daytime running lights do not illuminate. The daytime running lights illuminate once the parking brake is released. The daytime running lights will remain on until the ignition switch is turned to the OFF position.

When the daytime running light system is active, tail lights on your vehicle are not on. It is necessary at dusk to turn on your headlights. Failure to do so could cause an accident injuring yourself and others.
Turn signal switch

1 Turn signal
Move the lever up or down to signal the turning direction. When the turn is completed, the turn signals cancel automatically.
2 Lane change signal
To indicate a lane change, move the lever up or down to the point where lights begin flashing.
Fog light switch (if so equipped)

To turn the fog lights on, turn the headlight
switch to the  position, then turn
the switch
to the
  position. To turn them off,
turn the
switch to the OFF position.
The headlights must be on for the fog lights to operate.
When the headlight high-beam is selected, the fog lights turn off.
Hazard warning flasher switch

Hazard warning flasher switch
Push the switch on to warn other drivers when you must stop or park under emergency conditions.
All turn signal lights will flash.

- If stopping for an emergency, be sure to move the vehicle well off the road.
- Do not use the hazard warning flashers while moving on the highway unless unusual circumstances force you to drive so slowly that your vehicle might become a hazard to other traffic.
- Turn signals do not work when the hazard warning flasher lights are on.
The flasher can be actuated with the ignition switch in any position.
Some state laws may prohibit the use of the hazard warning flasher switch while driving.
Horn

Horn
To sound the horn, push the center pad area of the steering wheel.

Do not disassemble the horn. Doing so could affect proper operation of the supplemental front air bag system.
Tampering with the supplemental front air bag system may result in serious personal injury.
See also:
Changing a wheel
Removing a wheel
Location of jack, towing eyelet1 and tools ...
Brakes
Brake Fluid
Check the brake fluid level by looking at the reservoir in the engine compartment.
Check that the fluid level is between the “MAX” and “MIN” lines. If the brake fluid
level is near the “MIN” line, fill it up to the “MA ...

 Windshield wiper and washer switch